Zone PIB
Step 1 (open screen)
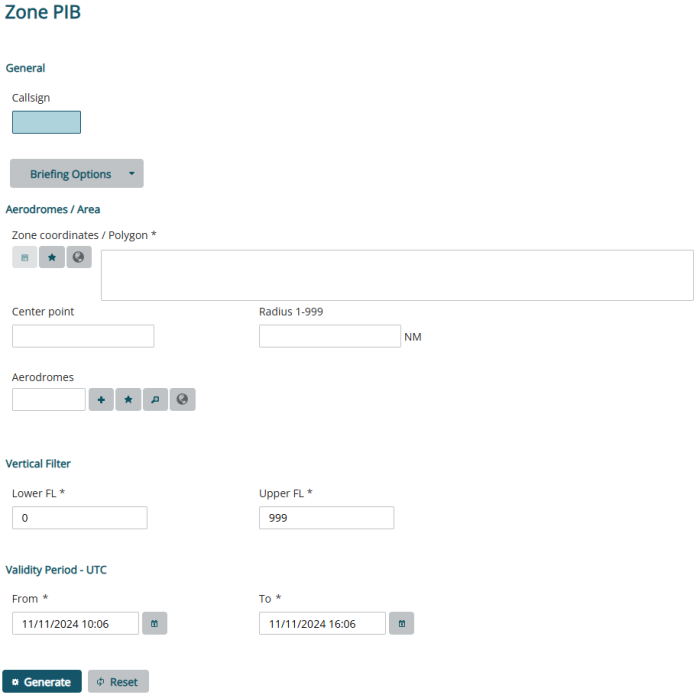
Select Pre-Flight Briefing > Zone PIB. The Zone PIB screens appears.
Fig.: Zone PIB
Step 2 (define briefing options)
The system allows you to enter filter criteria concerning the message types that you want to have included in the PIB Pre-flight Information Bulletin.
Fig.: Briefing Options
Message Type
Select the message type or types that you want to have included in the PIB.
Briefing Type
Briefing type lets you choose which kind of NOTAM Notice to Airmen you wish to have included in your PIB: international, national and/or military NOTAM. One of the check boxes must be selected (if none is selected an error message is raised).
Flight Rules
The system requires you to select one of the flight rules.
-
IFR stands for Instrument Flight Rules. A flight conducted in accordance with the Instrument Flight Rules is an IFR flight.
-
VFR stands for Visual Flight Rules. A flight conducted in accordance with the Visual Flight Rules is a VFR flight.
-
The third option is a combination of IFR and VFR.
NOTAM Purpose
-
Maximum: Includes NOTAM with any purpose
-
Standard: Includes NOTAM with purpose containing B and NOTAM with purpose containing O
Step 3 (define aerodromes/area)
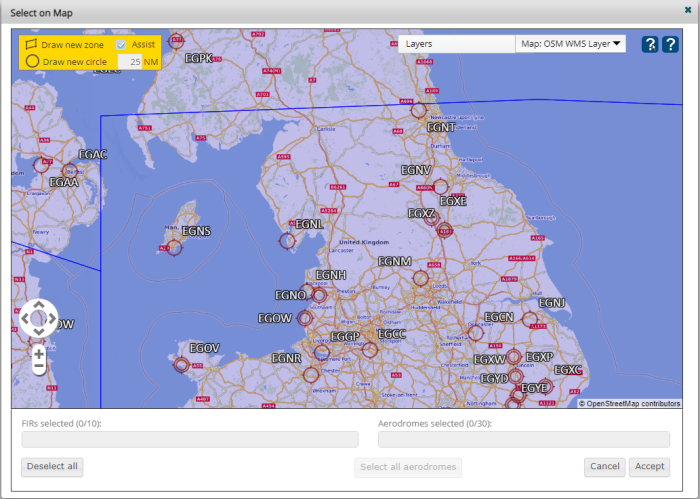
To define a polygon or a circle on the map, click the icon  . The window Select on Map opens.
- To define a polygon, click Draw new zone. Click the map to define the corners of the polygon. To stop drawing, double-click the map.
- To define a circle, click Draw new circle, click the map to define the center point, and enter the radius in the field in NM.
- To select all aerodromes that are in the defined area, click Select all aerodromes.
- To clear the area and all definitions, click Deselect all.
- To transfer the data to the PIB form, click Accept. The system adds either the coordinates or the center point and the radius, as well as the aerodromes, to the PIB form.
To select a saved personal area, click the icon  . The window Select personal area opens. Double-click an area in the list to add it to the PIB form. The system adds either the coordinates or the center point and the radius, as well as the aerodromes, to the PIB form.
To save a personal area, click the icon  . The window Save personal area opens. Enter a name for the area and click Save. To overwrite an existing list, click the list in the table and click Overwrite. For details, refer to Personal Areas.
Fig.: Zone PIB - Select on Map
Zone Coordinates / Polygon
You can also enter a polygon with coordinates, e.g. 5551N01733E 4942N00516E 4455N02558E.
Center Point / Radius NM 1-999
To define a circle, enter the center point in degrees, minutes, and seconds, e.g. 5551N01733E, and enter the radius in nautical miles (NM).
Aerodromes
To add more aerodromes, enter the ICAO International Civil Aviation Organisation location indicator of the aerodrome in the Aerodromes field and click the ![]() button. Below the Aerodromes table, Total displays the current number of aerodromes in the list.
button. Below the Aerodromes table, Total displays the current number of aerodromes in the list.
INFO The ICAO location indicator of aerodromes consists of a four-letter combination.
If you do not know the ICAO location indicator, click on the ![]() button. The Search Aerodromes page appears and allows you to search for an aerodrome. You can search for an aerodrome by ICAO code, IATA code, FIR Flight Information Region code, the aerodrome name or the type of aerodrome (aerodrome, heliport, landing site). Enter part of the ICAO code (for example, LO or ED) or the other fields and click Search. All aerodromes that meet the entered search criteria are displayed. Click on the aerodrome you want to add to your PIB. The selected aerodrome appears in the aerodrome list.
button. The Search Aerodromes page appears and allows you to search for an aerodrome. You can search for an aerodrome by ICAO code, IATA code, FIR Flight Information Region code, the aerodrome name or the type of aerodrome (aerodrome, heliport, landing site). Enter part of the ICAO code (for example, LO or ED) or the other fields and click Search. All aerodromes that meet the entered search criteria are displayed. Click on the aerodrome you want to add to your PIB. The selected aerodrome appears in the aerodrome list.
To icon  next to the field Aerodromes has the same functionality as the same icon next to the field Zone coordinates / Polygon (refer to Map).
Fig.: Search Aerodromes
Step 4 (define vertical filter)
Define the Lower FL, Upper FL and Aerodrome Radius (optional) around the aerodromes (default 5NM) in nautical miles.
Step 5 (define validity period)
From time is calculated on the basis of the client time. The client time is converted to UTC time according to the set time zone. To time displays the From time plus 24 hours.
Define the time range for which you want to have NOTAM included in the PIB. All NOTAM and messages of other selected types that are valid within the selected time range will be included in the PIB.
To define the From and To dates, either type in the values manually or use the Calendar pop-up. To open the Calendar pop-up, click the ![]() button. Select a month and day and click OK. The entered date must be the current date or a date in the future.
button. Select a month and day and click OK. The entered date must be the current date or a date in the future.
Step 5 (generate PIB)
To generate the Zone PIB, click on the Generate button. The PIB lists NOTAM and selected messages by FIRs.
Step 6 (optional: Highlight text)
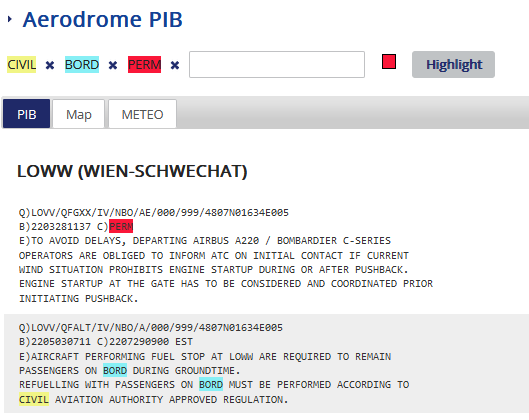
To highlight text in the PIB, enter text in the field, select the color and click Highlight. The text you entered in highlighted in the PIB dialog and in the PDF Portable docent format.
To remove highlighting, click the icon X next to the text.
To add personal stored keywords, click the icon  . The window Select stored keywords opens. Double-click a keyword list in the table.
To save the keywords you entered as a personal keyword list, click the icon  . The window Save as personal keywords opens. Enter a name and description and click Save.
For details, refer to Personal Keywords.
Fig.: Highlight Text in PIB (Example)
Step 7 (optional: send PIB in email)
The PIB can be sent via e-mail. To send the PIB to one or more e-mail recipients, click the Send as Email. The Email addresses dialog opens:
Fig.: E-mail
You can define a distribution list in this dialog by entering the e-mail addresses separated by commas.
Step 8 (optional: generate PDF)
The PIB can be exported to a PDF file by clicking on Print PDF button.


